Felco Pruners and Snips Maintenance
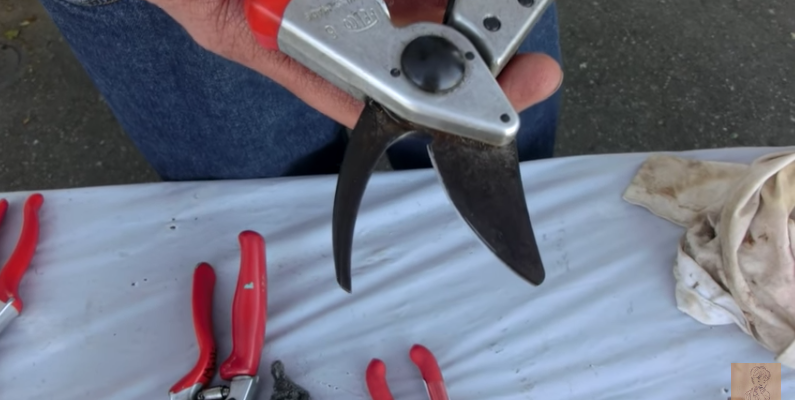
Felco provides videos on sharpening blades, changing blades, dismantling and oiling your felco products.
We’ve included some videos for reference, but you can search by your product number at Felco’s website.
How to clean & sharpen your pruning tools
[embedyt]https://youtu.be/vROuLbOuYq0[/embedyt]
Taking apart your Felco pruner
[embedyt]https://youtu.be/x7bi2e764rI[/embedyt]
Oiling your Felco pruning shear
[embedyt]https://youtu.be/gI9g41PlRGc[/embedyt]
Sharpening your pruning snips and shears
[embedyt]https://youtu.be/oHLOYrG5fHU[/embedyt]
We offer a full line of Felco pruners and snips, as well as parts.
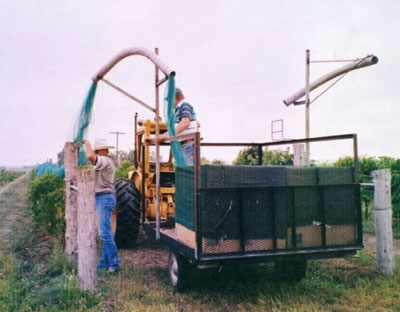
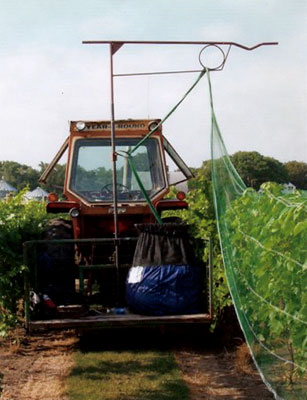
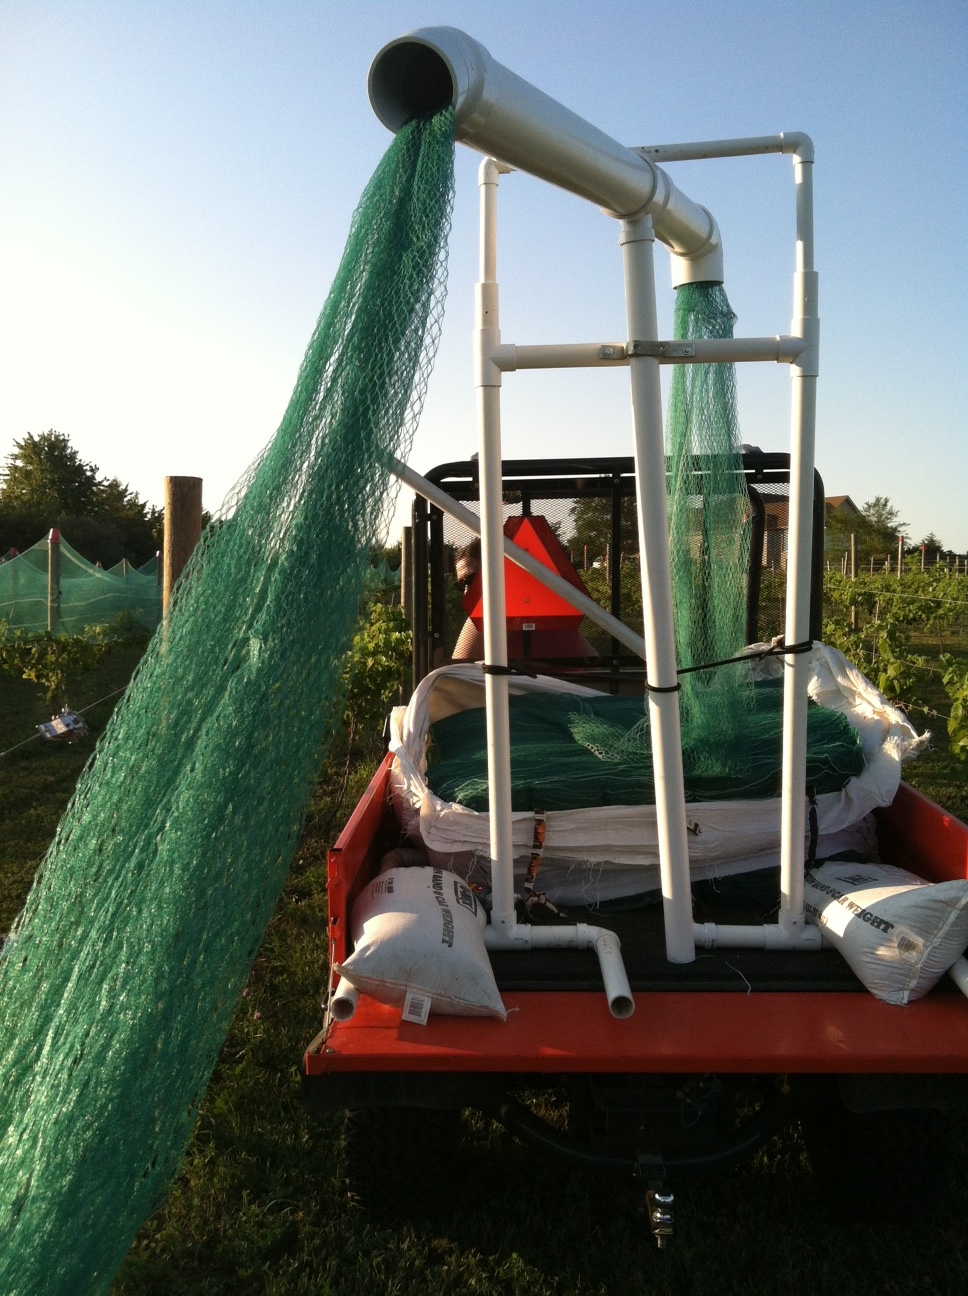
Installation and Removal of Woven Bird Netting
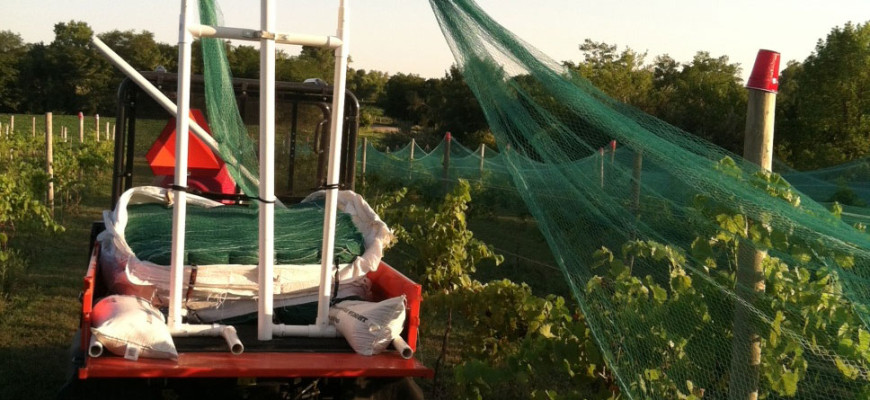
View our full line of vineyard bird netting products.
Woven Bird Netting
Photos courtesy of Ellen Burdick, Lewellen, NE
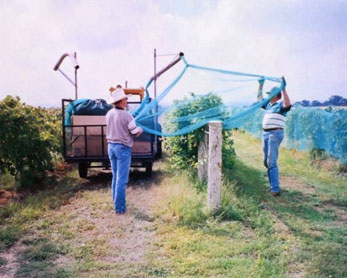
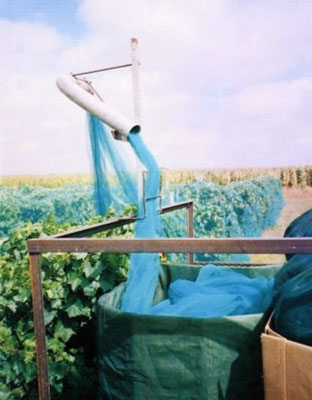
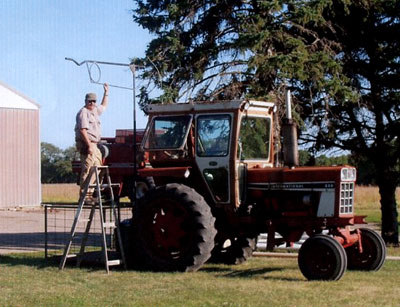
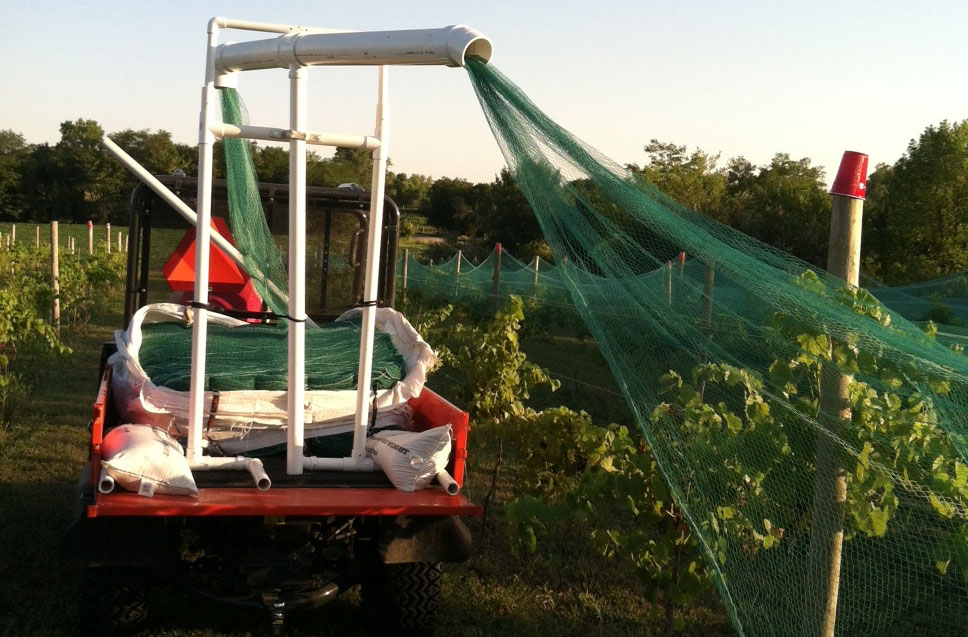
InterNet Netting Setup
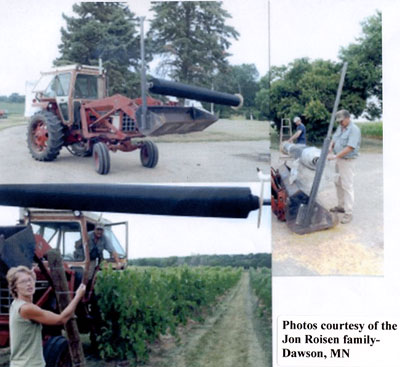
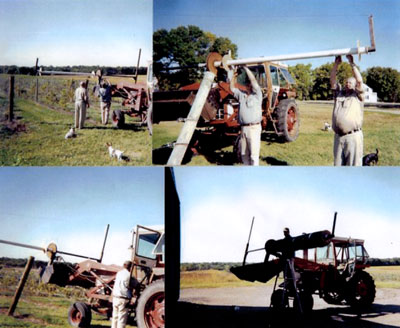
Woven Bird Netting Setup and Installation
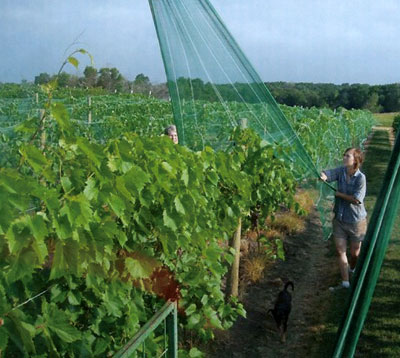
Photos courtesy of the Jon Roisen Family, Dawson, MN
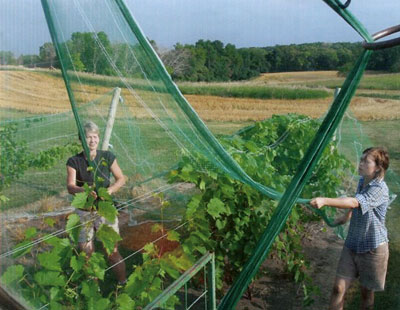
Installing White Bird Netting
Photos courtesy of Steve White in NE
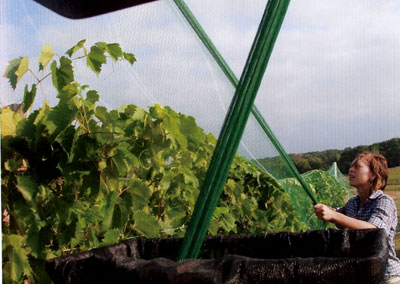
Photos courtesy of Junto Winery, Seward, NE – Net Winder Installed
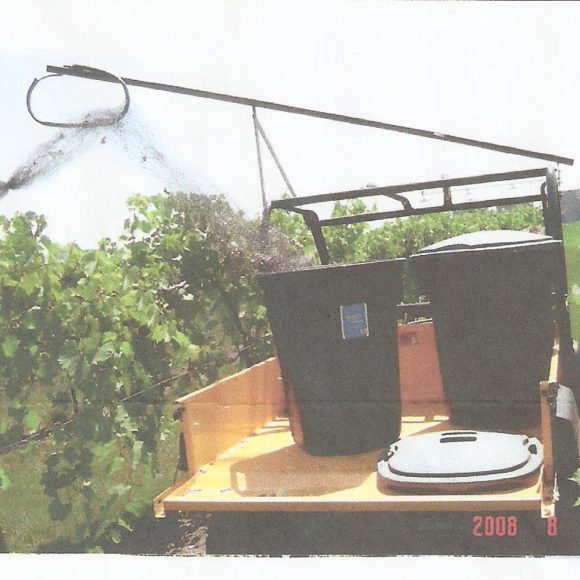
Photos courtesy of Duane Krause – Gator Application
pH Tester Care
Be sure to check out our full line of phTester products
Before You Begin:
Remove electrode cap. To condition electrode, immerse electrode in electrode storage solution, buffer or tap water for at least 30 minutes. Do Not use de-ionized water.
Calibration:
Calibration should be done regularly, typically every day that the Tester is used. You can calibrate at up to three points (ph 4,7, an 10).
1. Press on/off button to switch unit on.
2. Dip electrode 1/2 to 1” into chosen buffer (ph 4,7, or 10).
3. Press CAL button to enter Calibrate (CA) mode. ‘CA’ Flashes on the display. Then, a pH value close to the pH buffer value will flash repeatedly.
4. After at least 30 seconds (about 30 flashes) press the hold/con button to confirm calibration. The display will show ‘CO’ and then switch to the buffer value reading.
5. Repeat with other buffers if necessary. Rinse electrode in tap water before dipping into next buffer.
Calibration troubleshooting:
Failure to press hold/con to confirm calibration (step 4 above). Pressing the CAL button will resume measuring mode but will not enter the calibration value.
Insufficient sampling time. If the Tester does not have a long enough exposure to the buffer, a stable calibration point will not be reached. Wait at least 30 seconds before pressing Hold/Con.
Failure to rehydrate the electrode. A dry electrode will give fluctuating readings while it re-hydrates in a buffer, causing errors.
pH Testing:
1. Remove cap from the electrode and press the on/off button to switch Tester on.
2. Dip the electrode 1/2 to 1” into the test solution. Stir once and let the reading stabilize.
3. Note the pH or press Hold/Con button to freeze the reading. Press Hold/Con again to release the reading.
4. Press on/off to turn off Tester. If you do not press a button for 8.5 minutes the Tester will automatically shut off to conserve batteries.
Instrument Maintenance:
- Rinse the electrode with tap water or electrode storage solution after each measurement.
- In aggressive chemicals, dirty or viscous solution, and solutions with heavy metals or proteins, take readings quickly and rinse electrode immediately afterward.
- Periodic soaks in warm pH 4 buffer will help remove contaminants.
- If possible, keep a small piece of paper or sponge in the electrode cap- moistened with clean water or electrode storage solution (not de-ionized water)- and close the cap over the electrode.
Note: Tester life is dependent on meter and electrode care. If the electrode is exposed to materials that contaminate the reference junction, electrode life will be shortened.
When you need a new electrode, see “Electrode Replacement” on insert in back of box – follow link to order online.
Frequently Asked Questions About Bird Gard
View our full line of Bird Gard products
Bird Gard and Crop Management Instructions
Acoustical bird hazing is a proven method of stressing or harassing birds away from a crop, food source or habitat. Most of our bird repelling systems are “species specific.” To obtain maximum control, our growers have found that by using a random sound mixture of harassment, distress and alarm calls, excellent results have been attained. Active management control and understanding bird habits is the key to success.
For best results:
- Install the Bird Gard/Crop Gard unit Well before the crop begins to change color and birds are attracted. This creates a “KEEP OUT” area for most pests prior to harvest.
- Remember that most birds feed from the outside perimeter of a crop and use tree cover to roost in and for observation. Place speakers 15-50 feet inside crop pointing OUTWARDS whenever possible.
- Mount speakers at least three (3) feet above tree or crop levels for maximum coverage. Sound will disperse or reflect off solid barriers or thick brush. Mount control unit out of direct sun, if possible.
- When first installed, run the Bird Gard/Crop Gard units at FULL volume and on SHORT/MEDIUM time off periods. This ensures “pest stress” and “harassment”.
- Watch and be aware of bird habits and their reactions. Check flight paths and readjust speaker locations accordingly. Check power source and unit settings often to insure continuous bird hazing. Be certain that the system is not turned OFF during crucial times.
- Remember that the Bird Gard/Crop Gard system is a management tool. Effective results depend on your awareness of the local environment and attention to the system.
Be aware that under some situations of extreme drought or other adverse conditions, the pressure on the bird becomes so great that survival overrules any deterrent. - Robins spend most of their time on the ground, and may start to ignore bird scare placed above the crop. For them, also place some audio and visual scare near the ground (3-5 feet).
- Play all bird cries, at least at first. Otherwise, intervals between cries may be too long. This also acts as harassment. Always have at least one predator cry on with the other birds.
Frequently Asked Questions
Are the sounds output by the unit audible or loud?
Bird Gard products incorporate actual bird distress cries that are digitally recorded on a microchip. The distress cries are quite audible to humans. They sound like birds chirping. Each product is equipped with a volume control dial so that the sound can be adjusted for maximum effectiveness in the desired area of coverage and for user and neighbor comfort.
How do Bird Gard products work?
Bird Gard products use prerecorded actual bird distress sounds as well as predator or raptor alarms or calls to effectively repel birds. These sounds are digitally mastered using the highest quality microchips available. After sounds are recorded onto microchips, then those sounds are then amplified and broadcast using several size units covering areas from 1 1/2 to 40 acres in size.
Is the unit effective on pigeons, doves swallows and sparrows?
We have not been successful with pigeons, doves, swallows or sparrows, although we have had marginal success with the house sparrow (English sparrow).
Will the sounds affect domestic animals or livestock?
No animals are harmed by the Bird Gard sounds. Most domestic animals and livestock quickly get used to the sounds and are not negatively impacted.
Is the unit weatherproof or weather-resistant?
Bird Gard and Crop Gard products are designed for outdoor use and are completely weatherproof (with the exception of severe winds, tornados, etc.).
How long until results are evident?
The length of time may vary, but typically the birds will leave the area within 14 days. In most cases, you will see results very quickly. Fruit growers will need to have the unit in operation a few weeks before their crop begins to ripen.
Do the birds become accustomed to the sounds?
Bird Gard and Crop Gard products use a microprocessor the randomly emits the sounds in completely unpredictable patterns and at random time intervals. This keeps the birds from acclimating to the sounds.
What species of birds will the unit repel?
The units come in many recording configurations. The standard (Agricultural) version includes the distress cries of the starling, robin, house finch, common grackle, ring-billed gull, blue jay, red-winged blackbird and the predator cry of the sharp-shinned hawk. The Marine version includes the distress cries of the laughing gull, rig-billed gull, herring gull, black-headed gull, California gull, glaucous-winged gull, double-crested cormorant and the predator cry of the marsh hawk. We have a large library of recorded birdcalls and are always adding more. Many custom combinations are available upon request. Please check with our customer service department to see if we can help solve your specific bird control problem.
Where should I place my unit for maximum effectiveness?
The unit needs to face the area that is affected, and usually the unit is mounted on an wooden post or metal pole at a height of 4 to 6 feet above ground level. For an agricultural setting, the unit should be placed 2 to 3 feet above the level of the crop. With crops that grow fairly high, some speakers may need to be lowered so that sound is also protecting the area under the tree canopy.
How would I determine the species that is causing problems for me?
You may want to contact your local library, University Extension Service, Fish and Wildlife Agencies or a local chapter of the Audubon Society. One of these resources should be able to help you identify your bird species. Often, talking to your neighbors is helpful, too.
What about extreme temperatures?
The units will operate normal between 32 and 110 F.
Pruning Terms

Be sure to check out our full line of pruning products!
Arms. The main branches or extensions of the trunk.
Bud. The slightly enlarged portion in the node region of a cane from which shoots grow.
Canes. Shoots that are mature and have attained all or most of their full length. They may be devoid of leaves and dormant. Dormant canes are previous season’s annual growth.
Capacity. The degree of a vine’s ability to produce fruit and wood.
Disbudding. The removal of swollen buds or young shoots less than 1 inch long.
Fruiting wood. Canes or spurs that are selected for their size and quality and cut back to bear the current year’s crop.
Head. The part of the trunk, usually at the tip, from which branches or arms grow.
Internode. The portion of a shoot or cane between two nodes.
Laterals. The side branches of a shoot or cane.
Node. The joint or swelling on a shoot or cane where buds and leaves are found.
Old Wood. Wood on any part of a vine older than one year.
Pinching. The removal of the growing tip of a shoot by pinching between thumb and finger.
Pruning. The removal of excess parts of a vine above ground– canes, shoots, and leaves.
Renewal spur. A spur that produces shoots for the next year’s fruiting canes or spurs.
Shoots. The new green growth that develops from buds during the growing season and matures to form canes.
Spur. The basal portion of a cane after it is cut back to a length of 1 to 4 buds. ( The basal bud near the point where the cane joins an arm is not counted.)
Suckers. Shoots growing from below the surface of the ground.
Thinning. The removal of flower clusters, immature fruit clusters, of their parts.
Training. The direction or form given to a young vine as it grows, usually by attaching it ti a mechanical support.
Trunk. The main body or stem of a vine.
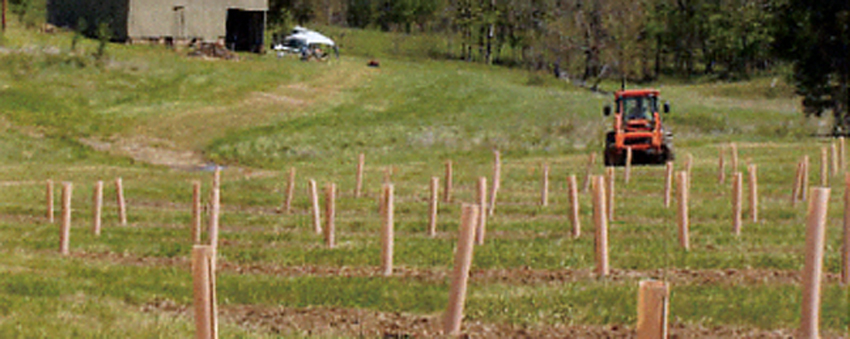
Grow Tubes FAQs
We carry TUBEX Vinegro Grow Tubes »
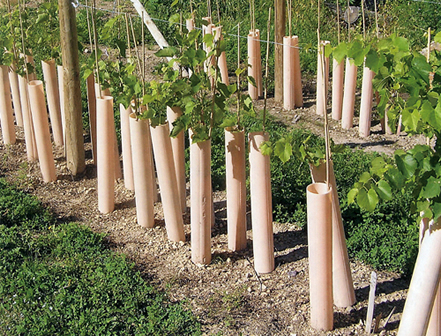
Photo courtesy of Duane & Martha Hubbs, Honey Hill Vineyard, WI
Even though tens of millions of grow tubes have been used successfully in vineyards throughout the world, there is still a great deal of confusion surrounding their benefits and proper use.
As with so many tools, the rule of thumb with grow tubes is simply:
- A good quality grow tube (properly used) creates cost savings and revenue increases far in excess of the cost of the tube. It multiplies the bottom line.
- A poor quality grow tube (or a good quality grow tube improperly used) does not create cost savings or revenue increases, and does little or nothing for the bottom line.
To help clear up the confusion, and help you get the most out of this proven technology, here are answers to some of the most Frequently Asked Questions about grow tubes:
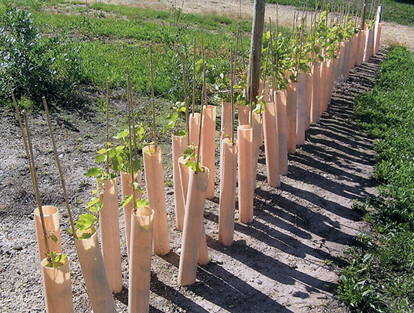
Photo courtesy of Duane & Martha Hubbs, Honey Hill Vineyard, WI
What are the benefits of using grow tubes?
Grow tubes offer grape growers several time- and money-saving benefits*:
1) Faster establishment of balanced, healthy vines – Grow tubes – good quality, large diameter grow tubes – accelerate the growth of both stems and roots, resulting in an increase of total vine biomass. This means:
· Your first commercial crop – the first ‘black ink’ entry you get to make in your ledger – comes sooner
· The period of time needed to ramp up to mature crop levels is reduced
2) Protection from herbicide spray makes weed control – the biggest challenge to Midwestern and Eastern grape growers – faster, easier, and more effective – No searching for vines amidst the weeds, no herbicide or mechanical cultivator damage to vines. For commercial growers, grow tubes dramatically reduce labor costs. For hobby growers with a limited number of man-hours to devote vineyard maintenance, grow tubes are indispensable.
3) Reduced vine training costs – Grow tubes automatically train vines to grow upward toward the cordon wire, saving several trips through the field to train vines. Again, this reduces labor costs for commercial growers and allows hobby growers to use their limited time for more productive activities – like weed control!
4) Protection from animal predation – Grow tubes protect newly planted vines from deer, rabbits and other rodents.
5) Increased vine survival under windy or drought conditions – Grow tubes – good quality, large-diameter grow tubes – reduce the moisture stress on newly planted vines, resulting in very high survival rates. This dramatically reduces the number of replants necessary. Replants are extremely expensive because their care and maintenance needs (weed control, training, spraying, etc.) are out of sync with the rest of the vineyard, and of course replants reduce the productivity of the vineyard until all vines reach maturity.
* These benefits result only from the use of large-diameter, high quality grow tubes.
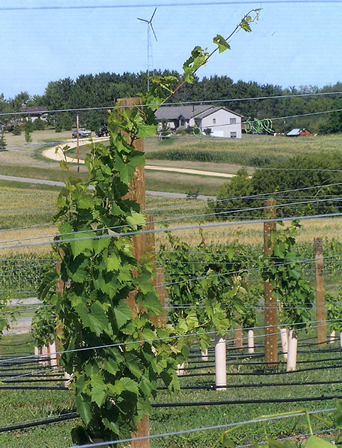
Photo courtesy of Duane & Martha Hubbs, Honey Hill Vineyard, WI
What are the disadvantages of using grow tubes?
There are no disadvantages when using large-diameter, good quality grow tubes.
Good quality, large-diameter grow tubes do, of course, increase the up-front investment for vineyard establishment. However, the savings from easier weed control, reduced vine training, faster establishment of healthy vines and reduced replanting far outweigh the cost.
Small diameter grow tubes, on the other hand, can adversely affect vine establishment. These tubes might cost less, but a cost with no associated benefit (or even a negative impact) is not a savings at all.
What are some things I should avoid in a grow tube?
1) Triangular or square shape. The flat surfaces of these shapes rapidly absorb heat when the sun’s rays hit them flush at certain times of day.
2) Small diameter & 3) Green color. Small diameter tubes prevent leaves from deploying at optimal angles for sunlight absorption and photosynthesis. Green tubes create an environment rich in green light. Both types of tubes cause the same set of problems. The vine gets the same sensory feedback as if it was surrounded by vegetative competition. In other words, the vine “thinks” it is surrounded by other plants (either physically pressing against it as with small diameter tubes, or reflecting green light as with green tubes).
All plants, grapevines included, respond to vegetative competition the same way: They allocate nearly all of their growth resources to ‘primary’ growth – growing taller – in order to gather more sunlight and to cast shade on surrounding plants. They allocate almost no resources to ‘secondary’ growth – stem thickness and root development.
Why bother developing thick stems and strong roots if surrounding plants are going to hog all the sunlight? The result: Tall, thin-stemmed grapevines.
What are the features I should look for in a grow tube?
1) Circular shape. Triangular and square designs absorb more heat at certain times of day when the sun’s rays are flush with a flat surface of triangular or square tubes. With a circular tube only a small portion of the tube is ever facing the sun’s rays directly, reducing the absorption of heat.
2) 3.5 inch diameter. Research shows grow tubes that are 3.5 inches in diameter dramatically increase total vine biomass production. Tubes of 3.5 inches in diameter produce 70% more total vine biomass, with thicker stems, and balanced root/shoot ratios.
3) Opens from the side. Grow tubes are left in place until after the vine is trained to the cordon wire. A well-designed grow tube allows you to remove it for re-use without untying the vine.
4) Pink/beige color. This color optimizes the ratio of light frequencies plants need for photosynthesis. This color gives vines the same sensory feedback as being in full sunlight, so that they allocate growth resources to ‘secondary’ growth – stem thickness and roots.
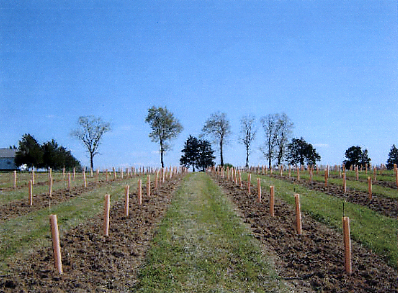
Photo courtesy of Monarch Hill Vineyards, St. Genevieve, MO
—————————————————————-
I have heard that grow tubes produce vines with thin, spindly stems. Is this true?
NO! – for large diameter, good quality grow tubes.
Research conducted at CSU Fresno showed conclusively that large-diameter (3.5 inches), good quality, pink/beige grow tubes produce vines with:
- Thicker stems
- 70% more stem dry weight (the most accurate measure of biomass growth)
- 70% more root dry weight
- The same healthy, balanced root/shoot ratio as the (much smaller!) vines without grow tubes
The myth of spindly-stemmed vines has persisted for two reasons:
1) Too many growers have used small diameter, triangular, or green grow tubes, have seen the thin-stemmed vines these tubes typically produce, and have mistakenly assumed that all grow tubes cause these problems.
2) Growers in regions where irrigation is used have occasionally over-watered their vines, which can inhibit growth.
For the thousands of growers who have used large-diameter, good quality grow tubes (and have used them properly) the results are universal: Bigger, healthier, balanced vines that bear fruit sooner and reach mature production levels faster.
I have heard that grow tubes reduce root development. True or false?
FALSE – for large-diameter, good quality grow tubes.
Circular grow tubes with a diameter of 3.5 inches produce vines with 70% more total biomass – 70% more stem weight AND 70% more root weight – in exactly the same, healthy root/shoot ratio as the (much smaller!) vines grown without tubes.
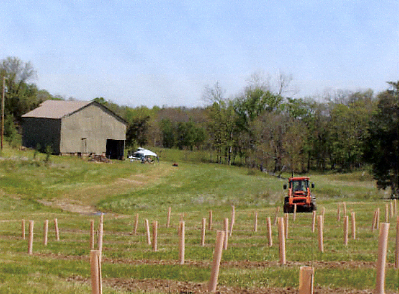
Photo courtesy of Monarch Hill Vineyards, St. Genevieve, MO
Should I re-apply grow tubes in the spring of the second year (before second leaf) in order to get another season of herbicide protection?
It is highly recommend that you remove grow tubes in autumn. Because vines in grow tubes are under far less stress, the period of active growth extends farther into the late summer and early fall. This can leave the vines more vulnerable to frost damage. This can be completely prevented by removing the grow tubes in early to mid-September.
If your extension agent or viticultural expert recommends re-applying grow tubes the following spring, follow this recommendation. The grow tubes will have little to no further beneficial effect on growth (having increased balanced biomass growth by 70% or so in first leaf), but they will continue to provide protection from herbicide spray, dramatically reducing the man-hours required to maintain the vineyard.
Controlling Birds In Your Vineyard
If you are feeding birds on your property, stop now. Birds will soon be returning from warmer climates, will start mating, and will build nests near a food supply. As their young grow, they will be taught about the food sources nearby.
As you go through your vineyard this spring, pruning and tying, remove any bird nests nestled among your grapevines!
Be aware of potential perching areas close to your vines. You may need more deterrents in these areas. These would be woodsy areas where birds can seek shelter and shade, fly out and eat grapes, then fly back for nighttime roosting.
As migratory birds return to your area, be observant as you spend time in your vineyard. What species of birds are hanging around? What hawks are in your area? This information will be important when it comes time to selecting deterrents.
BIRD CONTROL IN AUGUST and SEPTEMBER
Bird migratory behavior is starting. This means feeding changes for your resident birds, as well as new birds coming through your area. Flocks of birds are looking for a ready food source to keep them going as they migrate. Resident birds have produced more young, which are either being fed and introduced to your crop, or have learned and have formed their own feeding groups. It is sometimes hard to identify species of young birds (especially at a distance), as they have not fully acquired their adult plumage.
If by any chance, you still have bird feeders out, even empty ones will attract the attention of birds migrating. Your resident birds will continue to check feeders, as long as they’re up.
Are you using drip irrigation? Dripping water will attract birds. Robins especially are appreciative of this feature, as it also enables them to locate earthworms, should they desire a break from your fruit. If you can safely irrigate at times when birds are less likely to be around, that may help. Drought areas in your state will cause more aggressive bird feeding behavior, as they need moisture as well as food.
Whatever method of bird control you’re using needs stepping up at this time, and continue through harvest.
Bird distress units should have chips changed, speakers relocated, or speakers added. Add a visual deterrent to give the birds a focus – they look for what is causing the distress.
Be sure that your distress unit is working every day. Broken wires, dead batteries, and lightning strikes can cause problems with your unit. If you’re using a battery, consider getting a second battery for backup. Keep one charged, and the other powering your distress call unit.
We keep battery cables, adapters, extra speakers, a variety of recording chips, and the Bird Gard units themselves on hand, in case of emergency.
If you are using visual scare only, relocate those, add something new, change visuals, or add an auditory scare. Even audio tapes with loud sounds can be played. Try the sound track from Gettys- burg, or other tapes with gun sounds or loud noises.
For robins, put some scare items closer to the ground. Once they get down on the ground and under the canopy, they tend to ignore scare items above the crop. Suggestions from growers also include audio tape draped over the crop & fishline strung under the canopy and closer to the ground as a barrier.
If you’re using bird net, be sure that it is secured at the sides and bottom, especially if robins are your problem. They can get up underneath your net and eat your fruit. If you need help on bird identification or suggestions on what to do, we will be happy to assist you!
Grow Tube Installation
Quick methods to form a grow tube with the full diameter – for best growth of your grapevines!
1. Quick Tying
Push a length of tying material through the tabs on each end of the grow tube. Complete installation by wrapping top tie around the stake. (The bottom tie should be tied to itself) Optimal diameter of tube, once fastened shut, should be 3.5.
2. Staple
To form correct diameter (for best growth) place tube edge against tab on opposite side. Staple to permanently secure. Tie grow tube to stake or wire. Do not crush grow tube.
3. Pencil Rod
Line up the holes (be sure your diameter is 3.5) formed by opening the tabs. Push a 1/4″ pencil rod through the hole from the inside to outside. Push the rod through almost to the other end. Line up bottom holes. Push rod through bottom holes. Complete installation by pushing bottom of rod into soil and attaching to to trellis wire.
After tying and securing to stake or wire, mound up dirt around bottom of grow tube.
We sell the TUBEX Vinegro Double Wall Clipper Grow Tube.
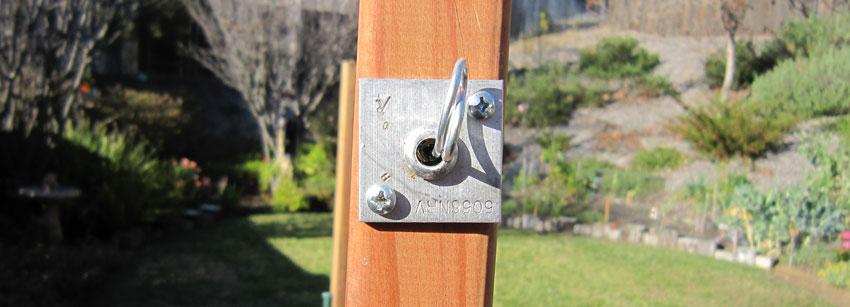
WireVise™ Installation
-
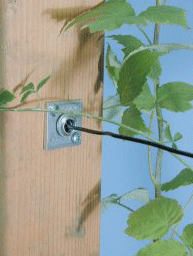 A hole is drilled in the end post or fence post for the wire.
 -
The Wirevise is then inserted into one end of the post hole.
-
The wire is then inserted through the other end of the post hole through the Wirevise which automatically holds the wire by its unique patented jaw system.
-
Tension is then applied by pulling the wire through the Wirevise using a claw hammer.
-
Excess wire should be bent sideways or downward.
Retensioning
To increase the tension of the wire at any time, just pull the wire through the Wirevise using one of the tensioning tools mentioned above.
We carry the WireVise Anchor System.
Grapefork Harvesting Tool
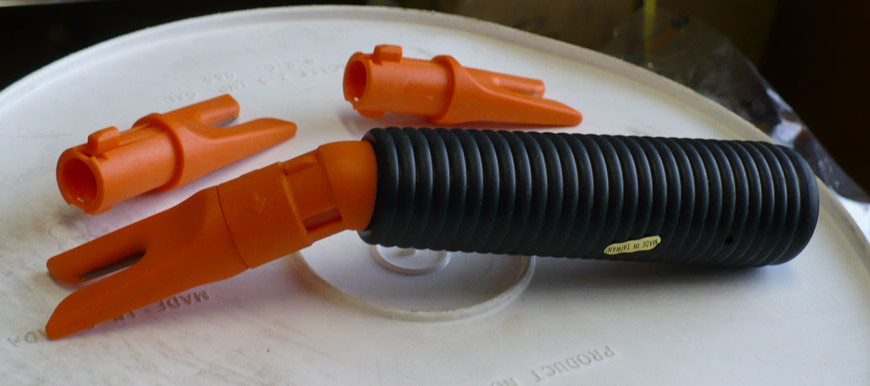
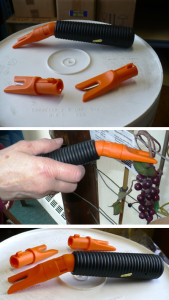
- No springs to break or blades to sharpen.
- The grape picker’s hand will not be as fatigued or pinched as occurs with repeated grasping of conventional shears.
- Fingers are not likely to be lacerated. The cutting head design does not allow fingers into the blade area.
- Grapevines can not be damaged by overzealous pickers.
- Simple care: wash with soap and water.
- No lubrication needed as there are no moving parts.
- No rust to worry about. When cutting head wears out (after about three tough days of harvesting), pop the head out and click in a new one. It’s simple! It’s tool-less!
- The cutting head can be positioned either perpendicular or parallel to the bend in the tool. Thus the blade orientation can adapt to the grape picker’s preference when harvesting waist high fruit (VSP) or higher trained fruit (GDC).
- Ergonomic bend in tool makes it easier to reach grape clusters. It also allows for greater leverage, or torque, for severing highly lignified cluster stems.
- The Grapefork Harvesting Tool is fast. Test rated the Grapefork Tool 10%-25% faster than shears when harvesting Cabernet Sauvignon. We sell the replacement for the Grapefork – the Cluster Cutter.